A quick and painless tutorial for the Robot Wants Kitty Editor
Basics
Basics
The original walkthrough
To start, you should be looking at the blank editor screen for a new level:
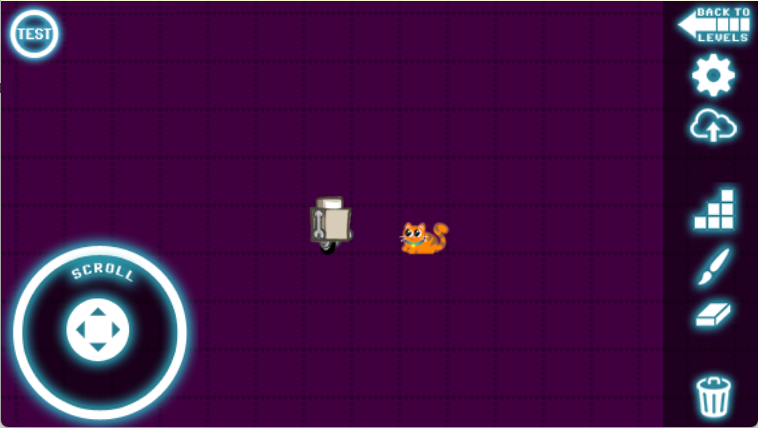
You can scroll the screen by touching inside the scroll circle and dragging. You can center the screen on the Robot by quickly tapping the center of the scroll circle twice.
The button in the middle of the sidebar (that one that looks like stairs) is the LAYOUT TOOLS button. When you touch it, you should see this:

These are all the layout tools that you can use to make a level. We'll worry about what each one does later-- for now, just touch the grey block at upper left. The grey block lets you place floors and walls that the Robot can't move or fall through.
By dragging your finger on the screen, you can place layout blocks. Let's just make a very simple level to start with; draw a platform system like this.

Now we have a simple level where it's impossible for the Robot to get to the Kitty. To fix this, you need to add a Jump powerup. Touch LAYOUT TOOLS again, and touch the yellow square with a J in it. This is the Jump Powerup.

Place the Jump Powerup someplace where the Robot can get it (if it's off the ground, he won't be able to reach it because he can't jump without it!)
Now that we have a simple level that can be won, touch the PAINT TOOLS icon, which is directly beneath the LAYOUT TOOLS icon.

Paint tools are just decorations that do not affect gameplay. They can only be drawn over layout blocks. Touch the first paint tool (the grey/blue box in upper left) to select it.
Now sweep your finger over the grey blocks that you have already placed. The paint tool will color them appropriately.

Note: If you want to create seams or overlaps in your painting, simply touch the paint tool again. Each time you select a tool, it will seperate itself from the previous tool and stop merging the paint blocks.
Also, some paint tools will only paint on certain layout blocks:

If you want to move either the Robot or the Kitty to change their starting location, simply drag them with your finger.

Now you can click the TEST button (top-left of screen) to try out the level. If it tests successfully, and you can reach the Kitty, it can be uploading to Kitty Connect!

The icons on the right side of the screen allow you to return to your level list, customize your level, share your level and more.
Warning: Pressing the trashcan icon will destroy your level completely. There is no way to undo this! The game will ask you to confirm twice to make sure it's really what you want to do.
Before you can share a level, you have to test it to prove that it can be won. If you win the level without losing a life, your level will be given a special "1UP!" flair on the shared levels list to show the user that it can be won without getting killed at all!
And that's all! But if you want to get all fancy and informed, open the sections below to show more information.
Layout Blocks
Layout Blocks

|
Solid walls/floors: Robot cannot pass through these. |

|
Death Block: Kill Robot on contact |

|
Brick: Can be broken from underneath by Robot with a helmet powerup |

|
Red Nuke: Explodes if set off by Robot with Explosors powerup, or by a nearby Nuke. |

|
Nuke: Explodes if anything else explodes next to it. |


|
Music Block: Changes the game music to one of three tunes. |

|
Transmatter Computron: Acts as a checkpoint if the player gets killed |


|
Doors: Require a keycard to open |


|
Keycards: Allow Robot to open doors of the corresponding color |

|
Jump App: Gives Robot the ability to jump |

|
Jump Upgrade: Gives Robot the ability to double-jump in the air |

|
Lazors: Gives Robot the ability to shoot lazors at enemies. |

|
Rocket: Allows Robot to rocket horizontally. |

|
Space Rocket: Allows Robot to rocket vertically |

|
Annihiliator App: Increases the speed of Robot's lazor guns hugely. |

|
Helmet App: Protects Robot from acid drips and breaks bricks. |

|
Heart App: Gives Robot an extra chance if he is hit by monsters. |

|
Explozor: Upgrades lazors with more damage, and can set off Red Nukes and melt Acid Blocks. |

|
Haxxor App: Causes sad computers to be happy and open doors. |

|
Timesaver App: Pauses the clock for 10 seconds. |

|
Electric Velcro: Allows Robot to stick to purple walls. |

|
Redguy: Places an enemy |

|
Eyeguy: Places an enemy |

|
Drip: Places an enemy |

|
Redboss: Places the Redguy Boss |

|
Eyeboss: Places the Eyeguy boss |

|
Dripboss: Places the Drip boss |

|
Boss block: When a boss is killed, the nearest boss blocks are removed. |

|
Sad Computer: Controls a set of sad computer blocks. |

|
Sad Computer Block: Removed when a nearby computer is happy. |

|
Quantum Crystal: Can power a Telematic |


|
Telematic: Controls teleporters. The arrow indicates the teleport sequence direction. |

|
Crystal Slot: Holds a Quantum Crystal to power a Telematic. |

|
Teleporter: Teleports Robot to a nearby Teleporter block when powered. |

|
Delete Defense App: Removes the Robot's ability to fire lazors |

|
Delete Space Rocket App: Removes the Robot's ability to rocket upward |

|
Delete Helmet App: Removes the Robot's protective and destructive helmet. |

|
Acid Block: Dissolves downward if set off by Robot with Explosors powerup, or by a nearby Nuke. |

|
Virus: Opens the nearest virus door if shot |

|
Virus Door: Removed when a nearby virus is shot |

|
Gold Keycard: Opens a single gold door. |

|
Gold Door: Can be opened with a gold keycard. |

|
Greenguy: Places an indestructible enemy that complicates jumps. |


|
One Way Field: Places a force field that objects can only pass through in one direction. |

|
Slo-Field: Robot passes slowly through this (also interrupts rocketing) |

|
Pinkfly: Places an enemy. |

|
Bitcoin: Something for the player to collect! |

|
Bitcoin Door: Opens when all bitcoins are collected |


|
Conveyor: Carries the Robot (and Kitty!) to different places. (Note: You can set conveyor speed in the level settings!) |

|
Conveyor Switch: Changes the direction of conveyors when touched. |

|
Robo-Zoing: Bounces the Robot. Stack zoings on top of each other to bounce higher! |

|
Solar Wind: This energetic upward flow of particles slows Robot's fall when he falls through it. |

|
Electric Velcro Wall: Robot can stick to this wall when he has the electric velcro powerup. |

|
Secret Wall: Paint over this with normal wall... but Robot can walk right through it! |


|
Spikes: Certain death for Robots! Get off them quickly before they can pierce your metal shell! |

|
Robot Radio: Displays a custom message for Robot! |

|
Phage: Garbage cleanup droid! Only activates when nobody is looking. |

|
Gun Control App: Lazor Damage +1 gives you more gun control over the situation. |

|
Vitamin E: No good for Robots, but doubles the hit points of any aliens that eat it! (Aliens will only eat up to three) |

|
Heatshield App: Allows Robot to traverse lava and acid while invincible |
Using Doors and Keys
Using Doors and Keys
Placing doors and keys is as simple as selecting the layout block and touching where you want the door or key to go.
To place a door, make a hallway that is one or two blocks high, like so: (Three blocks will not work correctly!)

Then, simply touch anywhere in the hallway to place a door. The door will detect where you touched and place itself intelligently.

Now just place the corresponding Keycard where Robot can get it, and you're in business!
Using Telematics and Quantum Crystals
Using Telematics and Quantum Crystals
Teleport systems are the most complex part of Robot Wants Kitty. A teleport system consists of a telematic, at least two teleport pads, and an optional Crystal slot.
So here is a setup for the simplest possible teleporter:

This system will teleport the Robot between the two teleport blocks counterclockwise (since there's only two teleport blocks, direction doesn't matter).
When you start an actual game, each teleport block (and crystal slot) will find the nearest telematic and attach to it. So when playing, this system looks like this:

A telematic can control as many teleport blocks or crystal slots as you want. A telematic is initially activated, unless it has a crystal slot attached to it. If it has one or more crystal slots attached, all crystal slots will need a quantum crystal in order to turn the teleporter on.
The system below will teleport the Robot CLOCKWISE (see the arrow on the telematic) through all four teleport blocks... but not until a crystal is placed in the crystal slot.

Remember, teleport blocks and crystal slots will find and attach to the NEAREST teleporter. You can have multiple telematics in a single level, but be careful to put your teleport blocks and slots closer to the one you want them to attach to!
But how do I...
But how do I...
If you have any more questions about how to use the editor, drop us a line, and we'll add to this page!